Social Icons

Pages

Wednesday, November 30, 2011

Binding Silverlight DataGrid using Linq to sql

This article explain in the simple way how to bind the silverlight datagrid using linq to sql. I have tried to capture all of the important details and provide a step-by-step example here.

Note, i'm using customer table of the  AdventureWorksLT Database for this project.
We will start creating the project in Visual Studio 2010
    1. Create a new Silverlight application and name the application as “DataGrid”.

    2. Right click on your the web project, then Add->New Item, and choose “LinqToSql”.

    3. Open the Server Explorer, then open the table and drag the table onto the Designer 
        workspace.

    4. The Serialization mode to Unidirectional by right-clicking on the Designer workspace and
         using the Property.

    5. Right click on your web project, then Add->New Item, and choose “WCF Service”.

    6.Open the IService1.cs file and add the GetCustomers method.
 List<Customer> list = db.Customers.ToList<Customer>();
    7. Open the Service1.svc.cs file and implement the GetCustomers method.
public List<Customer> GetCustomers()
{
DataClasses1DataContext db = new DataClasses1DataContext();
List<Customer> list = db.Customers.ToList<Customer>();
return list;
}
    8. Add a reference to the Web Service in the Silverlight project- To do that you need to
        right-click on the references in the Silverlight project and choose the
       'Add Service Reference' item. Then add the Service1.svc.


    9. Create a new DataGrid and Button and Set the DataGrid AutoGenerateColumns
        property as true. < AutoGenerateColumns="True" >

    10. In the button's Click event, create a new instance of the WebService, subscribe to the
          GetCustomerDetails event and call the GetCustomersAsync method.
     private void button1_Click(object sender, RoutedEventArgs e)
        {
       ServiceReference1.
Service1Client webService = new     DataGrid.ServiceReference1.Service1Client();
       webService.GetCustomersCompleted += new
  EventHandler<DataGrid.ServiceReference1.GetCustomersCompletedEventArgs>(GetCustomerDetails);
      webService.GetCustomersAsync();
        }
    11. Finally, in the GetCustomerDetails event handler, bind the DataGrid. Using this code
void GetCustomerDetails(object sender, DataGrid.ServiceReference1.GetCustomersCompletedEventArgs e)
{
this.Customer_Grid.ItemsSource = e.Result;
}
    12. Now run the program and click on display button to display the details.

Tuesday, November 15, 2011

Passing value from Child window to Parent window

Child Window is a great new feature in silverlight which enables you to use benefit of a fully better popup window. In this article I will explain the simple way how to pass the information child window to parent window

I am going to create an example in which user enters his/her first name and last name in a Child Window and once submitted entered first name and last name are displayed in the main page.

     1. We will start creating new Silverlight application in Visual Studio 2010 
     Click "New   project" in the Menu bar,Select " Silverlight Application" and name the  
     application as "SilverlightChildWindow".

     2. Add a new Child Window 
    In visual Studio right click on your Silverlight project, then, Add ->New Item ->  
    Silverlight Child Window. The Child Window will have an OK and a Cancel button by 
    default  when it is created. Add two textbox controls to the page for users to enter 
    their information.

     3. Create an EventHandler in Child Window
       public event EventHandler SubmitClicked;
    4. Create public properties to save the values
    Here I create two public properties of type string to save the value of both textBox  
    controls.
private string firstName;
  public string FirstName
   {
    get { return firstName; }
    set { firstName = value; }
   }
private string lastName;
  public string LastName
   {
    get { return lastName; }
    set { lastName = value; }
   }
     5. Pass the event once ok button is clicked in Child Window
     There should already be ok button in the child window when button is pressed; it is called  
     ‘OKButton_Click’. Inside that we need to fire the event which we created earlier, so that 
     our event gets fired when the code reaches this method.
    if (SubmitClicked != null)
            {
                FirstName = txt_FirstName.Text;
                LastName = txt_LastName.Text;
                SubmitClicked(this, new EventArgs());
            }
    this.DialogResult = true;
    6. Create a new instance of the Child Window in the MainPage.xaml page
private ChildWindow1 childwindow;
    7. Call the Child Window
    To do that, use the instance, which already created just call the method for Child Window.
private void button1_Click(object sender, RoutedEventArgs e)
        {
            childwindow.Show();
        }
     8. In MainPage.xaml catch up the submit event in Child Window
     Now we have an event which will get fired up from the Child Window when we click the 
     OK  button.
childwindow.SubmitClicked += new EventHandler(childWindow_SubmitClicked);
    9. Access the properties of the Child Window
private void childWindow_SubmitClicked(object sender, EventArgs e)
      {
            txt_FirstName.Text = childwindow.FirstName;
            txt_LastName.Text = childwindow.LastName;
        }

  • Main Page
  • Child Window

    • Again Main Page

      Wednesday, November 2, 2011

      Process of creating Snapshot

           1. Open SQL Server Management Studio, connect to the publication server and expand the replication folder.

           2. Connect to the Publisher in Management Studio, and then expand the server node, expand the Replication folder, and then expand the Local Publications folder.

           3. Right-click the publication for which you want to create a snapshot, and then click Properties.

       
           4. On the publication properties, select the snapshot page.

      • To select file path thick check box “put file in the following folder”
      • To get compress snapshot file thick check box “compress snapshot files in this folder”
      • Click ok to save the modification.
           5. Right-click the publication and then click View Snapshot Agent Status.


      6. Click start button to create snapshot.


      Tuesday, November 1, 2011

      Process of creating subscription

      This article provides step by step configuring  publication in SQL Server 2008R2
           1. Open SQL Server Management Studio, connect to the publishing server and expand the Replication folder.

           2. Inside the replication folder, right click Local Subscriptions and choose New Subscription from the  pop-up menu.


           3. Inside the replication folder, right click Local Subscriptions and choose New Subscription from the pop-up menu.

           4. Click ‘Next’ on the New Subscription Wizard welcome page.

           5. Then it will display publication screen, select the publication database and click ‘Next’ button to continue.

         
           6. Then, Select whether you wish to create a push or pull subscription and Continue. Here with pull subscription.


           7. On the subscribers window, select the subscriber database and click ‘Next’ to continue


           8. On the Merge Agent Security page, click … and enter the security account settings details.

       
      Merge agent security settings 


           9. On the Synchronization schedule window, keep the defaults and click ‘Next’ to continue.


           10. On the Initialize Subscriptions page, keep the defaults and click ‘Next’ to continue.


            11. Select the Subscription type and click ‘Next’ button.


           12. Then Enter the Host_Name value and click ‘Next’ button.


           13. On the Wizard Actions window, select the action when you click finish and click ’Next’ to continue.


           14. On the Complete the Wizard page, review the subscription settings and click Finish to create the subscription. SQL Server will provide a status window informing you of its progress creating the new subscription.


      Monday, October 17, 2011

      Process of creating publication

      This article provides step by step configuring  publication in SQL Server 2008R2
      1. Open SQL Server Management Studio, connect to the publication server and expand the replication folder.
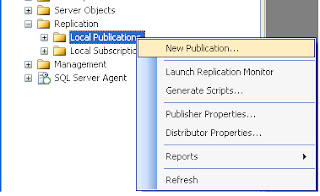
      2. Inside of the Replication folder, Right-click on the publication and select ‘New publication
             3.  The “Create Publication Wizard” starts, press “Next” button.   
             4.  In the next window, select the database that you wish to create a publication and click ‘Next’ button.

                  5. In the publication type, select the publication type <merge publication> that you wish to use and click   ‘Next’ button.

                   6. On the subscriber type’s window, specify the Subscriber Types. Select Servers running <SQL Server 2008> then click ‘Next’ button.

                     7. Select the Object Types (like Tables, Stored Procedures and Views) which you want to publish, and  click ‘Next’ to continue.

                       8. Then it will show some issues which may require some changes at later stages in order to work as expected. Just click ‘Next’ to continue.

                    Adding Filters   
                    • On the Filter table rows window, click ‘add’ button to add filter table 
                      •   Then select the table, column and set the parameter and click ok button.
                      Here I’m using Rephost coloumn and parameter =<rephost=HOST_NAME> 

                           9. Then it will display snapshot agent screen, select snapshot agent type and click next button to continue.
                         
                             10. Then select the security agent type and click next button to continue.

                        Snap shot agent security settings
                        • Specify the domain or machine account and set the connection type.

                             11. Then it will display wizard action screen, select the option and click next button to continue.
                           

                               12. Then enter the publication name and select Click Finish to create a Publication

                          Thursday, October 13, 2011

                          Setting up Replication in SQL Server 2008 R2

                          Replication is one of the accessibility features available in SQL Server. And it allows database administrators to distribute data to various servers throughout an organization.

                          In this article, I will demonstrate the step by step approach to configuring replication in SQL Server 2008R2 Before we start with the configuration, we need to understand three important terms:

                          • Publisher- Publishers have data to offer to other servers. Any given replication scheme may have one or more publishers.
                          • Subscriber- Subscribers are database servers that wish to receive updates from the Publisher when data is modified. The subscriber database normally resides on a different server in another location.
                          • Distribution Database- A database that contains all the Replication commands database can reside on the same server as the publisher, but it is always recommended to keep them on a separate server for better performance. Normally, when you hold the distribution database on the same machine as the publisher database if there are many publishers and publishers are always an impact on the performance of the system. This is because, for each publisher, one distrib.exe file is created.

                          Microsoft SQL Server supports the following three types of database replication
                          Merge replication: 
                          The Merge replication is used when both Publisher and Subscriber need to make changes to their personal databases. In this case both databases might have been changed between runs of the Merge SQL replication, and the replication merges the changes in both locations. Of course when using merge replication you should be aware that there might be conflicts, for example duplicated primary keys. If there is a conflict, then the merge replication follows predetermined conflict resolution plan to correct the issue. 
                          Transactional replication:
                          The Transactional replication is usually used with databases where data changes frequently and there’s need for constant refreshing of the data. The replication process watches the publisher’s database for any changes, if there are changes; it distributes them over to the replication subscribers.
                          Snapshot replication:
                          Snapshot replication acts in the manner its name implies. The publisher simply takes a snapshot of the entire replicated database and shares it with the subscribers. Of course, this is a very time and resource-intensive process. For this reason, most administrators don’t use snapshot replication on a recurring basis for databases that change frequently. There are two scenarios where snapshot replication is commonly used. First, it is used for databases that rarely change. Second, it is used to set a baseline to establish replication between systems while future updates are propagated using transactional or merge replication.


                          Wednesday, October 12, 2011

                          Easiest way to detect an open form in C#

                          During winforms programming, where you do not want to open a form multiple forms.
                          Here is a way to check there is already a form open before opening a new one.
                          public partial class MainForm : Form
                          {     
                                  private Frm_ Form frm_Form;

                          private void OpenForm()           
                                 {

                                      if (frm_Form != null)               
                                      {
                                          if (frm_Form.IsDisposed == false)
                                          {
                                             frm_Form.Activate();
                                          }
                                          else
                                          {
                                             frm_Form = new Frm_ Form ();
                                             frm_Form.Show();
                                          }
                                      }
                                      else
                                      {
                                             frm_Form = new Frm_ Form ();
                                             frm_Form.Show();
                                      }
                                        

                                 }
                          }

                          Tuesday, October 11, 2011

                          Numeric validation

                          Here's a small method for validating numeric in C#. It may save you some time.
                          public static bool DecimalInputValidation(TextBox textBox, KeyPressEventArgs e)
                          {
                          try
                                      {
                                          if (e.KeyChar == (char)8 || e.KeyChar == (char)46)
                                          {
                                              e.Handled = false;
                                              return true;
                                          }
                                          if (e.KeyChar >= (char)48 && e.KeyChar <= (char)57)
                                          {
                                                string val = textBox.Text;
                                              val = val + e.KeyChar.ToString();
                                              decimal intVal = 0;
                                              bool con = decimal.TryParse(val, out intVal);
                                              if (con)
                                              {
                                                  e.Handled = false;
                                                  return true;
                                              }
                                              else
                                              {
                                                  e.Handled = true;
                                                  return false;
                                              }
                                          }
                                          e.Handled = true;
                                          return false;
                                       }
                                      catch (Exception exp)
                                      {
                                          throw exp;
                                      }
                          }